Rust is a great programming language: reliable, fast, enjoyable, but also rather complex. Over the past two years, I’ve been using it both professionally and on side projects (such as Espanso) and, over that time, I stumbled upon many useful patterns and crates that I wish I knew when I first started learning it.
Using Cow<str> as return type
Sometimes you need to write methods that accept a string slice (&str) and conditionally return either a modified version of it or the original one. For these cases, you might use Cow<str>, so that you only allocate new memory when necessary.
use std::borrow::Cow;

fn capitalize(name: &str) -> Cow<str> {
    match name.chars().nth(0) {
        Some(first_char) if first_char.is_uppercase() => {
            // No allocation is necessary, as the string
            // already starts with an uppercase char
            Cow::Borrowed(name)
        }
        Some(first_char) => {
            // An allocation is necessary, as the old string
            // does not start with an uppercase char
            let new_string: String = first_char.to_uppercase()
              .chain(name.chars().skip(1))
              .collect();

            Cow::Owned(new_string)
        },
        None => Cow::Borrowed(name),
    }
}

fn main() {
    println!("{}", capitalize("bob"));   // Allocation
    println!("{}", capitalize("John"));  // No allocation
}
Crossbeam channels instead of the standard ones
The crossbeam crate offers a powerful alternative to standard channels with support for the Select operation, timeouts, and more. Similar to what you get out of the box in Golang and traditional Unix sockets.
use crossbeam_channel::{select, unbounded};
use std::time::Duration;

fn main() {
    let (s1, r1) = unbounded::<i32>();
    let (s2, r2) = unbounded::<i32>();
    s1.send(10).unwrap();

    select! {
        recv(r1) -> msg => println!("r1 > {}", msg.unwrap()),
        recv(r2) -> msg => println!("r2 > {}", msg.unwrap()),
        default(Duration::from_millis(100)) => println!("timed out"),
    }
}
Golang-like defer operator with Scopeguard
If you are coming from Golang, you might miss the "defer" operator for certain use-cases (like freeing memory when working with raw pointers or closing a socket).
In Rust (besides the RAII pattern), you can use the scopeguard crate to easily implement "cleaup" logic.
#[macro_use(defer)] extern crate scopeguard;

fn main() {
    println!("start");
    {
        // This action will run at the end of the current scope
        defer! {
           println!("defer");
        }

        println!("scope end");
    }
    println!("end");

    // Output:
    // start
    // scope end
    // defer
    // end
}
Cargo-make for packaging
Build scripts are great for a lot of things, but usually not for packaging. My favorite solution for that is Cargo Make by sagiegurari, a Rust-based task runner and build tool.
Customize and chain Panic handlers
Panic handlers (called hooks) can be overridden and chained, which becomes particularly useful when setting up custom error reporting and logging for your application.
use std::panic::{set_hook, take_hook};

fn main() {
    let prev_hook = take_hook();

    set_hook(Box::new(move |panic| {
        println!("custom logging logic {}", panic);

        prev_hook(panic);
    }));

    let prev_hook = take_hook();

    set_hook(Box::new(move |panic| {
        println!("custom error reporting logic {}", panic);

        prev_hook(panic);
    }));

    panic!("test")

    // Output:
    // custom error reporting logic panicked at 'test', src/main.rs:20:5
    // custom logging logic panicked at 'test', src/main.rs:20:5
}
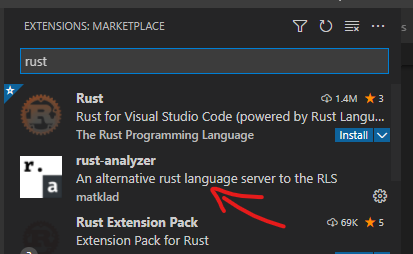
Use Rust Analyzer on VSCode
The Rust analyzer VSCode extension by matklad is significantly better than the “official” Rust one. Unfortunately, it’s still showing as a second result on the extensions marketplace, misguiding a lot of beginners.
Use impl Trait when working with Closures
Prefer impl Fn/FnOnce/FnMut to pass a closure to a function (called impl Trait) instead of a generic when possible to keep the signature clean. For non-trivial cases, you might need to box the closure with Box<Fn()>, but keep in mind you’ll pay an additional overhead.
// Instead of this

fn setup_teardown_generic<A: FnOnce()>(action: A) {
    println!("setting up...");

    action();

    println!("tearing down...")
}

// Use this

fn setup_teardown(action: impl FnOnce()) {
    println!("setting up...");

    action();

    println!("tearing down...")
}

// As a note, this pattern is very useful inside tests
// to create/destroy resources.

fn main() {
    setup_teardown(|| {
        println!("Action!");
    })

    // Output:
    // setting up...
    // Action!
    // tearing down...
}
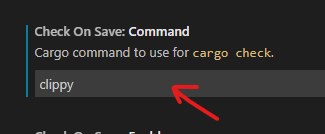
Enable Clippy on Save for VSCode
If you’re using VSCode + Rust Analyzer, I highly suggest going into the settings > Rust Analyzer > Check On Save: Command and setting "clippy" as the new default instead of "check". Same UX, better warnings.
Use “thiserror” and “anyhow” for idiomatic error handling
Use the thiserror and anyhow crates for idiomatic error handling. You should use thiserror when the consumer needs to conditionally act based on the error, anyhow otherwise. A good guideline is “use thiserror for libraries and anyhow for applications”.
Using dbg!() macro instead of println!()
Use the dbg!() macro instead of println!() when debugging. Less code, more useful information.
fn main() {
    let var1 = 2;

    println!("{}", 2); // Output: 2
    dbg!(var1);        // Output: [src/main.rs:5] var1 = 2
    dbg!(var1 * 2);    // Output: [src/main.rs:6] var1 * 2 = 4
}
include_str!() and include_bytes!() macros
Use the include_str!() and include_bytes!() macros to read the content of a file at compile time and store it inside a const. Useful to avoid messing with multiline string literals.
// Both of these files are read at *compile time*
const FILE_CONTENT: &str = include_str!("./path/to/the/file.txt");
const BINARY_FILE_CONTENT: &[u8] = include_bytes!("./path/to/image.png");

fn main() {
    println!("{}", FILE_CONTENT);  // Output: file content as string
}
Integrating with C/C++ code
If you need to integrate C/C++ code with Rust, the cc crate and the proper build script can get you pretty far. For example, I’ve used them to integrate wxWidgets, a popular C++ gui framework, with my project Espanso (see the build script)
// Inside the build script (build.rs)

fn main() {
  println!("cargo:rerun-if-changed=src/native.c");
  println!("cargo:rerun-if-changed=src/native.h");
  cc::Build::new()
    .include("src/native.h")
    .file("src/native.c")
    .compile("nativemodule");
  println!("cargo:rustc-link-lib=static=nativemodule");
}

// Then, in another Rust file (for example, ffi.rs)

#[link(name = "nativemodule", kind = "static")]
extern "C" {
  pub fn your_cool_c_module();
}
Thanks for reading! If you like these topics, make sure to follow me on Twitter and YouTube to stay updated with the latest articles and videos.