After almost 3 years, we finally took the necessary steps to code-sign Espanso. This article covers the step I’ve taken to integrate the code-signing and notarization steps in our automatic CI flow. This process is built with GitHub Actions in mind, but you can easily port it to your CI provider of choice.
Prerequisites
- Having a paid Apple Developer Program subscription. This costs about ~$99 per year depending on your country and is necessary to generate the required certificates.
- Having a CI that builds your final App bundle. This bundle can be generated in a lot of different ways, just keep in mind we’ll need the final
bundle.appinside the CI to perform the signing and notarization. This article won't cover the bundle generation, so please take care of that beforehand if you haven't already.
Generating the Certificate
If you have already generated a certificate for your app, feel free to skip this section
In order to sign the app, we need a valid certificate issued from Apple. You can issue one following these steps:
- Navigate to the Apple Developer portal into the Certificates, Identifiers & Profiles section and select “Create a New Profile”
- You’ll be asked to choose a certificate type, select “Developer ID Application” from the options and then continue

Selecting the right option from the “Create a New Certificate” section
- For the “Developer ID Certificate Intermediary” choose
G2 Sub-CA (Xcode 11.4.1 or later)and keep this webpage open, we’ll get back to it later

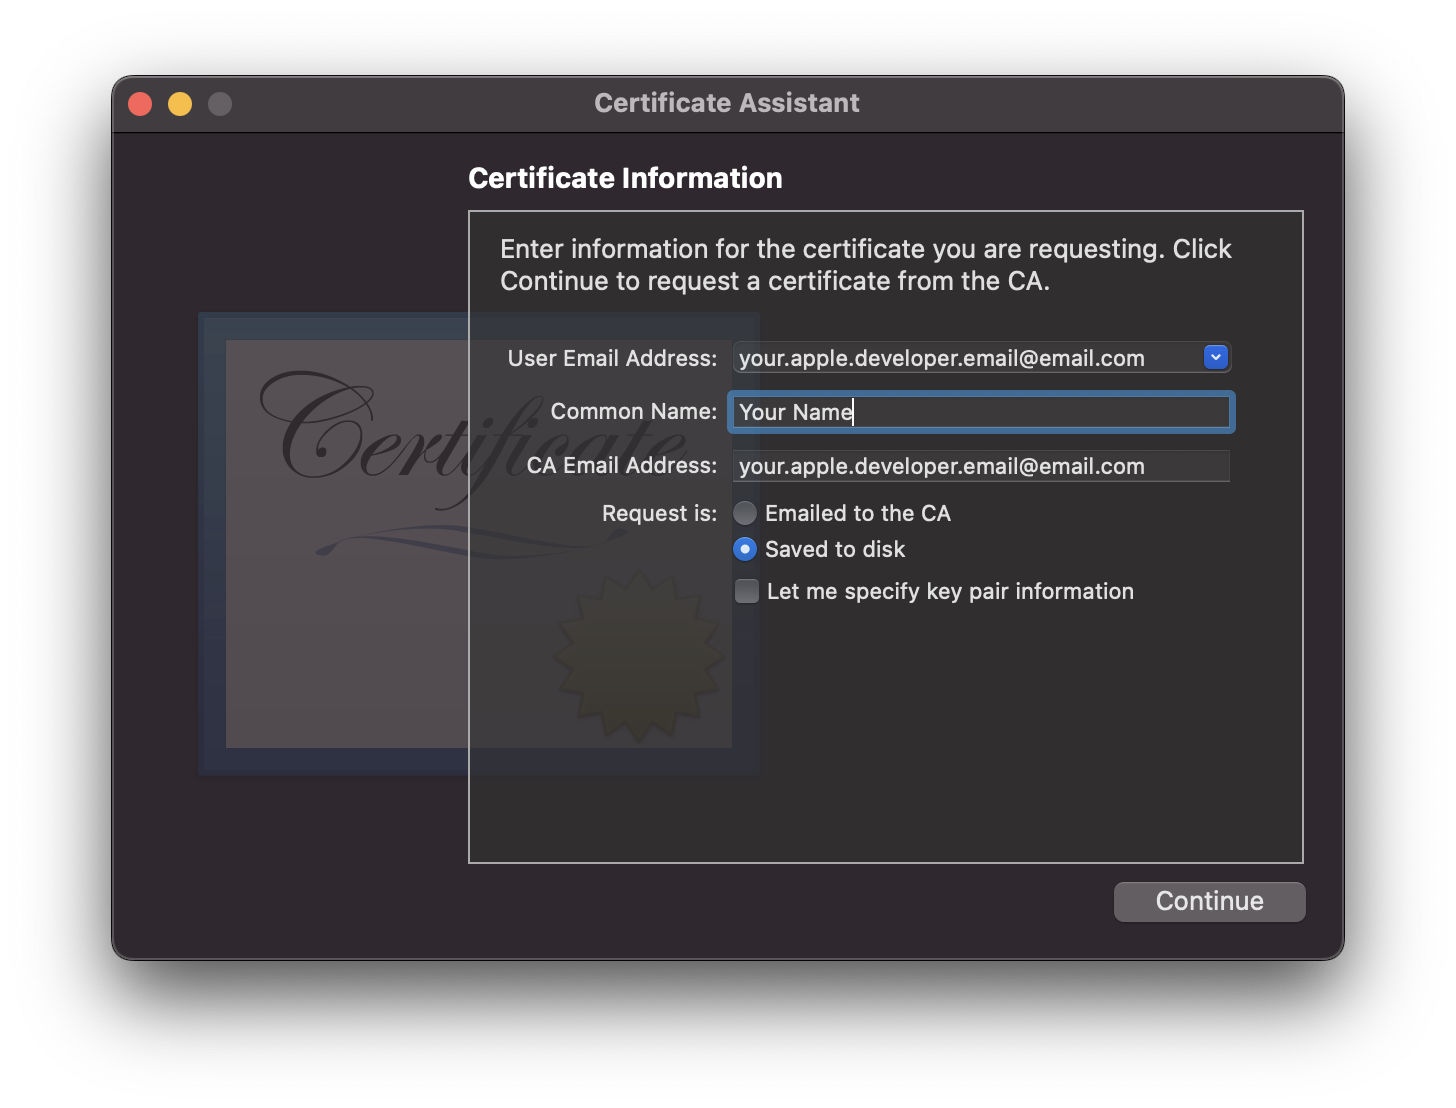
- Then, we need to generate a Certificate Signing Request (CSR). We can do so by opening the “Keychain Access” app on macOS, selecting
Certificate Assistant > Request a Certificate From a Certificate Authority...

-
You’ll be prompted for some information, make sure to specify the same email you used for your paid Apple Developer subscription, then check the
Save to Diskoption, and clickContinue
-
This will create a
CertificateSigningRequest.certSigningRequestfile in your location of choice. Go back to the “Create a New Certificate” webpage we opened earlier and click on “Choose File”, selecting the certificate request file we just created. Finally, click “Continue” -
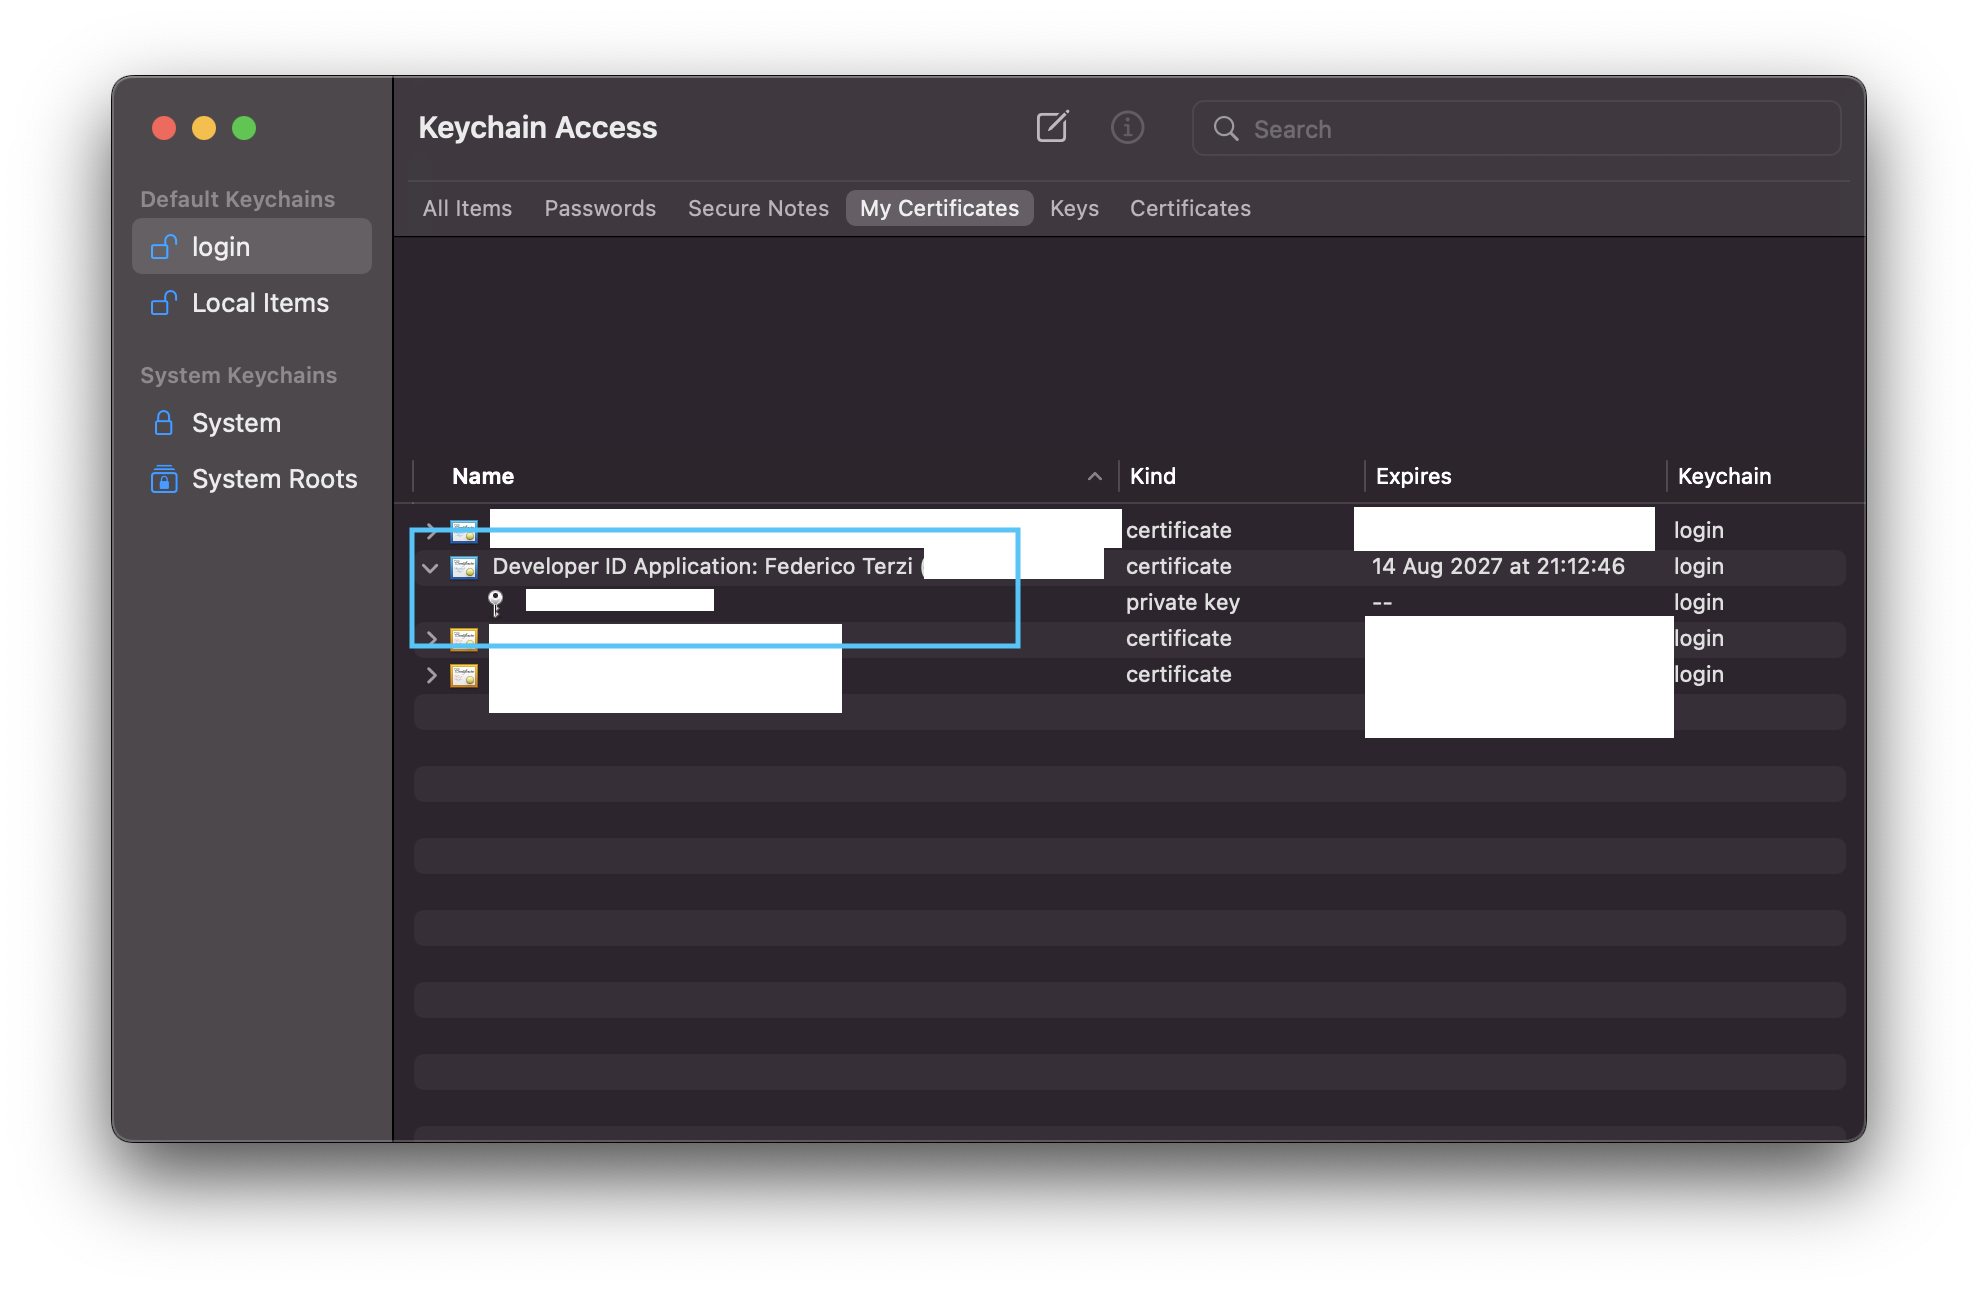
On the Apple Developer portal, you should now see your new certificate. Download it and open it using the
Keychain Accessapp on your mac. It should look like this:
-
Please note down the full name of the certificate (such as
Developer ID Application: Your Name (K1234), as we will need it later)
This certificate is ready to be used locally, but we want to export it in a format that is usable inside an automated (and headless) CI environment. For this reason, we are going to use the same trick from this great article by Localazy, exporting the certificate file and then encoding it as base64.
-
Select both the certificate (Developer ID Application: …) and the private key (the item below), then right click and choose “Export 2 items…”
-
In the panel that opens up, select a target location for the certificate file and choose
Personal Information Exchange (.p12)format. -
You’ll be asked for a password, generate a strong one using your tool of choice and note it down, as we’ll need it in the upcoming steps
-
Open a terminal,
cdinto the directory in which you created the certificate file, and convert it into base64 using this command:base64 Certificates > Certificates.base64This command will create a new
Certificates.base64file with the certificate encoded as base64 string. Keep this file around, as we’ll need it when populating the GitHub Actions secrets.
Gathering the Notarization information
Before diving into the GitHub Actions setup, we need to gather some more information for the notarization step:
Generating an app-specific password
We need to generate an Apple’s app-specific password for the notarization step:
-
Navigate and sign in to appleid.apple.com using the same account as your paid Apple Developer subscription
-
On the Sign-in and Security page, select “App-Specific Passwords”

-
Then select “Generate App-Specific Password”, and give it a meaningful name, such as “Project CI Notarization”
-
Then, enter your account password and finally “Continue”
-
You should now see a generated password, please note it down as we’ll need it later.
Getting your Team ID
- Head over to the membership page, logging in if necessary
- Inside the page, you should see a
Team IDfield. Note it down, as we will need it later
Setting up the GitHub Actions pipeline
Now that we gathered all the necessary information, it’s time to set up the GitHub Actions steps that will code-sign and notarize our app.
Setting up the Secrets
Navigate to your GitHub project Settings > Security > Secrets > Actions. Here we’ll need to register several secrets for the process to work correctly, so let’s start:
PROD_MACOS_CERTIFICATEshould contain the base64 of the certificate we generated earlier. In particular, you should paste the content of theCertificates.base64file herePROD_MACOS_CERTIFICATE_NAMEshould contain the full certificate name, such asDeveloper ID Application: Your Name (K1234567)PROD_MACOS_CERTIFICATE_PWDshould contain the password you choose when exporting the certificate from theKeychain AccessappPROD_MACOS_NOTARIZATION_APPLE_IDshould contain your apple developer email, the same you use for the Apple Developer subscriptionPROD_MACOS_NOTARIZATION_PWDshould contain the app-specific password we generated earlierPROD_MACOS_NOTARIZATION_TEAM_IDshould contain theTeam IDwe got earlier from the membership pagePROD_MACOS_CI_KEYCHAIN_PWDshould contain a strong, randomly generated password. Feel free to use your tool of choice for this.
If you did everything right, you should end up with these 7 secrets in your GitHub Actions:

Defining the Code-signing step
Now that we have all our secrets in place, we are ready to define the code-signing step. For the sake of these examples, we assume that the app bundle will be placed in the target/mac/Espanso.app path inside the CI environment. Make sure to replace it with the appropriate location of your app.
This is what the GitHub Actions step should look like in the end, with comments explaining the various sections:
- name: Codesign app bundle
  # Extract the secrets we defined earlier as environment variables
  env:
    MACOS_CERTIFICATE: ${{ secrets.PROD_MACOS_CERTIFICATE }}
    MACOS_CERTIFICATE_PWD: ${{ secrets.PROD_MACOS_CERTIFICATE_PWD }}
    MACOS_CERTIFICATE_NAME: ${{ secrets.PROD_MACOS_CERTIFICATE_NAME }}
    MACOS_CI_KEYCHAIN_PWD: ${{ secrets.PROD_MACOS_CI_KEYCHAIN_PWD }}
  run: |
    # Turn our base64-encoded certificate back to a regular .p12 file

    echo $MACOS_CERTIFICATE | base64 --decode > certificate.p12

    # We need to create a new keychain, otherwise using the certificate will prompt
    # with a UI dialog asking for the certificate password, which we can't
    # use in a headless CI environment

    security create-keychain -p "$MACOS_CI_KEYCHAIN_PWD" build.keychain
    security default-keychain -s build.keychain
    security unlock-keychain -p "$MACOS_CI_KEYCHAIN_PWD" build.keychain
    security import certificate.p12 -k build.keychain -P "$MACOS_CERTIFICATE_PWD" -T /usr/bin/codesign
    security set-key-partition-list -S apple-tool:,apple:,codesign: -s -k "$MACOS_CI_KEYCHAIN_PWD" build.keychain

    # We finally codesign our app bundle, specifying the Hardened runtime option

    /usr/bin/codesign --force -s "$MACOS_CERTIFICATE_NAME" --options runtime target/mac/Espanso.app -v
A note before proceeding further:
- Specifying the
--options runtimeflag for thecodesigncommand enables the Hardened Runtime for our app. This is necessary to pass the following notarization step (otherwise it fails when notarizing), but this might interfere with your app, as it disables JIT and other dynamic features. If you need them, you’ll need to specify the exceptions in your app’s entitlement file, as explained in the hardened runtime documentation.
Defining the Notarization step
After the code-signing step, our app is ready to be Notarized, which is necessary to prevent macOS from showing a scary warning to our users when opening the app.
The GitHub Action step should look like the following. This again assumes that the app bundle is located in the target/mac/Espanso.app path, so adapt it accordingly:
- name: "Notarize app bundle"
  # Extract the secrets we defined earlier as environment variables
  env:
    PROD_MACOS_NOTARIZATION_APPLE_ID: ${{ secrets.PROD_MACOS_NOTARIZATION_APPLE_ID }}
    PROD_MACOS_NOTARIZATION_TEAM_ID: ${{ secrets.PROD_MACOS_NOTARIZATION_TEAM_ID }}
    PROD_MACOS_NOTARIZATION_PWD: ${{ secrets.PROD_MACOS_NOTARIZATION_PWD }}
  run: |
    # Store the notarization credentials so that we can prevent a UI password dialog
    # from blocking the CI

    echo "Create keychain profile"
    xcrun notarytool store-credentials "notarytool-profile" --apple-id "$PROD_MACOS_NOTARIZATION_APPLE_ID" --team-id "$PROD_MACOS_NOTARIZATION_TEAM_ID" --password "$PROD_MACOS_NOTARIZATION_PWD"

    # We can't notarize an app bundle directly, but we need to compress it as an archive.
    # Therefore, we create a zip file containing our app bundle, so that we can send it to the
    # notarization service

    echo "Creating temp notarization archive"
    ditto -c -k --keepParent "target/mac/Espanso.app" "notarization.zip"

    # Here we send the notarization request to the Apple's Notarization service, waiting for the result.
    # This typically takes a few seconds inside a CI environment, but it might take more depending on the App
    # characteristics. Visit the Notarization docs for more information and strategies on how to optimize it if
    # you're curious

    echo "Notarize app"
    xcrun notarytool submit "notarization.zip" --keychain-profile "notarytool-profile" --wait

    # Finally, we need to "attach the staple" to our executable, which will allow our app to be
    # validated by macOS even when an internet connection is not available.
    echo "Attach staple"
    xcrun stapler staple "target/mac/Espanso.app"
Bonus: troubleshooting Notarization issues
While you are testing the notarization process, it might happen that the above GitHub Action step fails, with an error like:
Current status: Invalid....Processing complete
  id: <RANDOM-ID>
  status: Invalid
In these cases, you can view the notarization logs by using the following command (replacing <RANDOM-ID> with the actual one, which you can see in the step logs)
xcrun notarytool log <RANDOM-ID> --keychain-profile "notarytool-profile"
Conclusion
Your app should now be fully code-signed and notarized, great job! As a result, no more scary warnings will be shown to your users:

Acknowledgments
This article wouldn’t have been possible without this awesome article by Localazy for the code-signing steps and this GitHub comment for the Notarization part, kudos to Jan Bílek and Brad King!
