I love automating things, especially the boring ones. Having a Youtube channel, I found that editing videos can be very time-consuming and so I started thinking about ways to improve my workflow.
My main bottlenecks are cutting the video clips and transferring the videos to the PC. Because I record those videos with my smartphone, I wanted an app that could:
- Control the camera from my PC
- Organize the clip files in a way that makes editing easier
- Send the clips automatically to my computer
I searched for a while on the Play Store, but I couldn’t find an app that completely satisfied my needs and so, being a developer, I decided to create my own.
Forking Open Camera
Creating a Camera App isn’t a trivial task, so it made sense to start from an existing project. Luckily for me, Mark Harman created Open Camera, an awesome open-source camera App for Android that I used as a starting point.
The goal at this point was clear, forking Open Camera and adding the remote control and file transfer functionality.
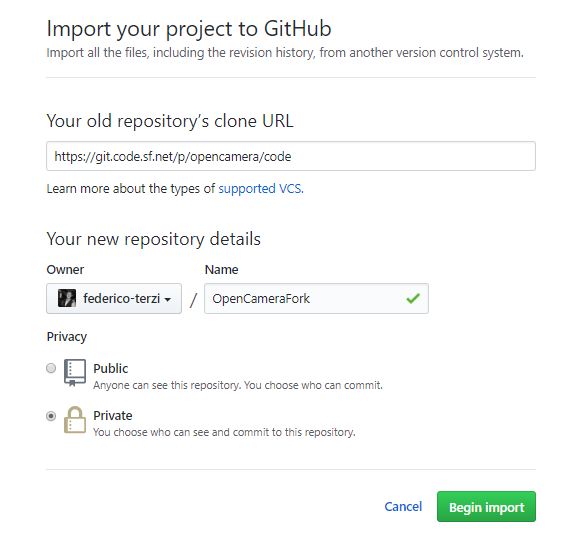
The Open Camera repository is hosted on Sourceforge but I wanted to fork it on Github. Thanks to the Github Importer utility, the process was painless.
Compile the Sources
After cloning the repository, I was ready to open the project with Android Studio to study the source, but first, I had to check if I could compile the app.
I started the compilation process, but as I already had Open Camera installed on my smartphone, I got a naming conflict:
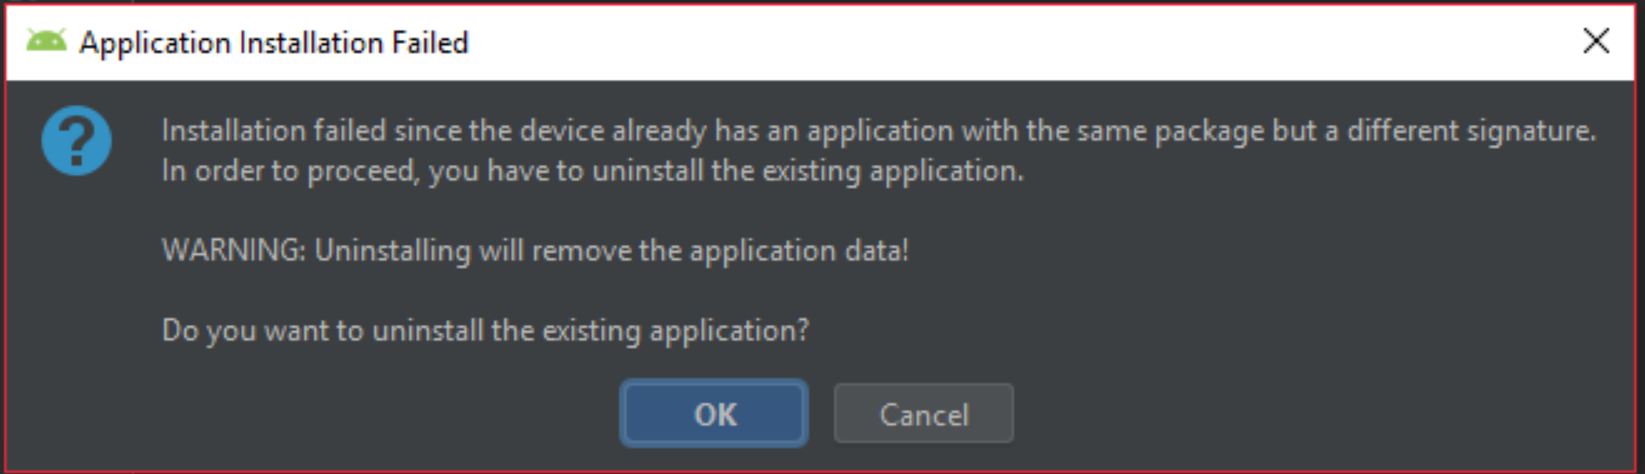
This happened because both the original and my forked version shared the same package id. To fix this problem, all I had to do was to rename the package. All occurrences of net.sourceforge.opencamera had been replaced with com.federicoterzi.opencamerastudio.
This was easily accomplished with the refactoring functions of Android Studio, combined with the very useful Find in Path action.
It’s also necessary to change the folder structure to reflect the new package name. This StackOverflow question helped me in the process.
At this point, I had a shiny new app on my smartphone, Open Camera Studio, ready to be tweaked.
Studying the Source
I wanted to manage the camera app remotely, so the next thing to do was to find out how Open Camera controlled the recordings.
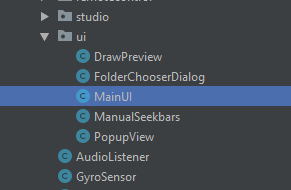
I started digging in the source code. I wanted to find the UI code that triggered the recording and the class MainUI caught my attention.
Scrolling through the source, I stumbled upon the onKeyDown method, apparently used to manage the events from volume buttons and selfie sticks, which in turn called the MainActivity’s takePicture method.

After a bit of experimenting, I determined that the takePicture method enabled both the start and the stop of a video recording, so I was ready for the next phase.
Adding Remote Superpowers
There are many ways to make the app capable of receiving remote commands, but I found that the most versatile one is the bundled web server approach: a basic HTTP web server is started in the app itself and other devices in the network can send requests ( such as commands ) and get responses ( such as video files ).
This solution also has the additional advantage that it could be possible to create a Web App, hosted by the web server itself, to control the smartphone from any web browser in the network. I chose a different route though because I wanted to keep things simple.
The easiest way to bundle a web server on Android is the NanoHTTPD Library, which can be used by including the following dependency in the Gradle config file:
implementation 'org.nanohttpd:nanohttpd:2.3.1'
I was also necessary to add the following permissions in the AndroidManifest.xml:
<uses-permission android:name="android.permission.ACCESS_WIFI_STATE" />
<uses-permission android:name="android.permission.INTERNET" />
I then created the StudioServer class extending the NanoHTTPD class and overriding the serve method. This function will be called anytime a client makes an HTTP request to the bundled webserver.
At this point, I needed a way to trigger the takePicture method when the serve method was called. Unfortunately, I could not call it directly as the takePicture method must be called from the main thread. So I used the powerful LocalBroadcastManager class to setup a receiver in the MainActivity that called the takePicture method and a broadcast from the serve method to trigger it:
BroadcastReceiver
In the MainActivity I added the receiver code:
private BroadcastReceiver studioCommandReceiver = new BroadcastReceiver() {
        @Override
        public void onReceive(Context context, Intent intent) {
            takePicture(false);
        }
    };
And the code to register/unregister it:
public static final String STUDIO_BROADCAST_ID = "STUDIO_BROADCAST";

// Inside the onResume() method
LocalBroadcastManager.getInstance(this).registerReceiver(studioCommandReceiver,
                new IntentFilter(STUDIO_BROADCAST_ID));

// Inside the onPause() method
LocalBroadcastManager.getInstance(this).unregisterReceiver(studioCommandReceiver);
Server
StudioServer class:
package com.federicoterzi.opencamerastudio.studio
import android.content.Intent
import android.support.v4.content.LocalBroadcastManager
import com.federicoterzi.opencamerastudio.MainActivity
import fi.iki.elonen.NanoHTTPD
import java.io.File
import java.io.IOException

class StudioServer(val mainActivity: MainActivity, val port : Int) : NanoHTTPD(port) {

    override fun serve(session: IHTTPSession): Response {
        val intent = Intent(MainActivity.STUDIO_BROADCAST_ID)
        LocalBroadcastManager.getInstance(mainActivity).sendBroadcast(intent)
        return newFixedLengthResponse("OK")
    }
}
And finally, the code to start the StudioServer in the MainActivity:
private StudioServer studioServer;

// In the onCreate() method
studioServer = new StudioServer(this, 8000);

// In the onResume() method
try {
    studioServer.start();
} catch (IOException e) {
    e.printStackTrace();
}

// In the onPause() method
studioServer.stop();
Now every time the MainActivity is opened, a WebServer is started on port 8000.
Let’s say the smartphone has 192.168.1.100 as IP, then any other device in the same network can access the server at the address: http://192.168.1.100:8000/. Anytime a request is made, the app should start/stop a recording.
What’s next?
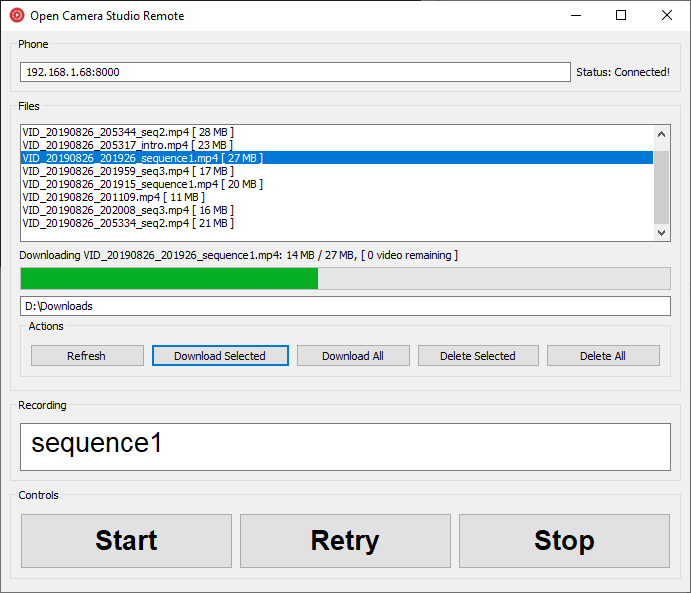
This was a very basic proof of concept you can use as a starting point when building something similar. I also added many features to the app, such as file transfer and clip naming, that you can check out in the Github Repository.
In the next article, we will see how to create the Desktop control panel in Go.
Stay tuned :)