Last week I finally released the first version of espanso, a cross-platform, system-wide Text Expander written in Rust.

I've built many projects in my life, but this time I wanted to create something people would actually use. Therefore, one of the key aspects to consider was the installation process: it has to be easy.
Being a cross-platform tool, I had to consider the best installation method for each platform and when it comes to macOS, the de-facto way to install a cli tool is by using Homebrew.
In this article I will show you the publishing process I used for my tool, espanso.
Preparing the binary
In order to create an Homebrew package, you have to provide a binary executable. Luckly for us, Rust makes it super easy. In your project directory, the following command will create an optimized, release-ready, version of your tool:
cargo build --release
You will now have a binary executable in the target/release/ directory, in my case:
target/release/espanso
Homebrew expects a TAR archive, and it's easy to create one using the commands:
cd target/release
tar -czf espanso-mac.tar.gz espanso
At this point, you should have the espanso-mac.tar.gz archive in your target/release directory.
We will later need the SHA256 hash of the archive, so let's calculate it using:
shasum -a 256 espanso-mac.tar.gz
Save it somewhere, we will need it later.
Uploading to Github Releases
Homebrew requires a URL to download your binary. There are plenty of ways to host your executable, but for my project I used GitHub Releases, mainly because it's free and easy to use.
Open your project's GitHub page, navigate to the Releases section and then click on Create a new release.
Insert a tag version, such as v0.1.0, a title and then drag the previously created archive ( in my case espanso-mac.tar.gz ) into the upload section. You should have something like this:
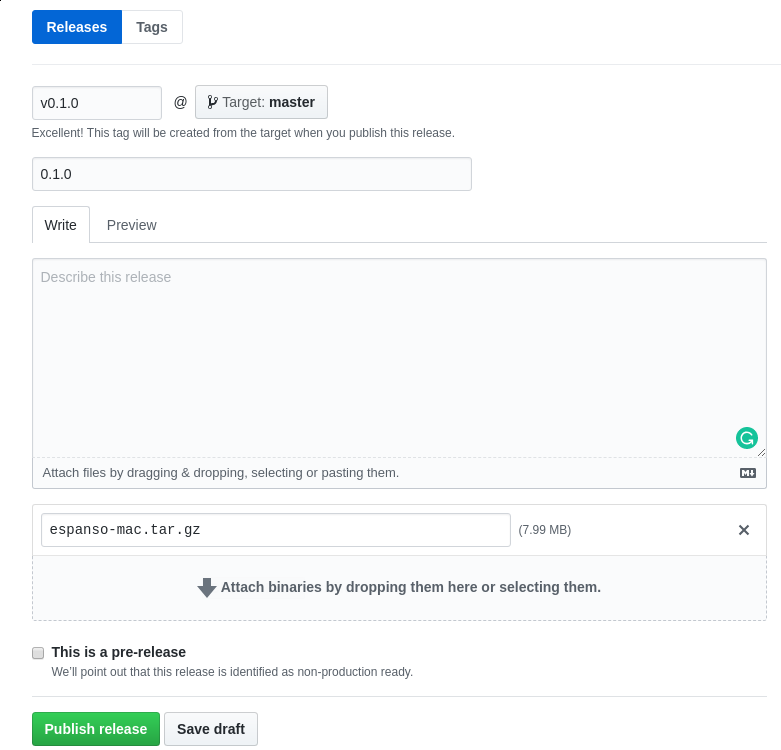
Now click Publish release to complete the process.
In the Release page, you'll need to grab the archive URL. Expand the Assets section and copy the url of the espanso-mac.tar.gz archive you've just uploaded. In my case:
https://github.com/federico-terzi/espanso/releases/download/v0.1.0/espanso-mac.tar.gz
Save it somewhere, we will need it later.
Preparing the Github Repository
Homebrew offers a way to create third-party repositories, Taps. In a nutshell, Taps are just GitHub repositories with specific names and a few configuration files.
We will need to create one to host our project. Go ahead and create a new GitHub repository, having the following name:
homebrew-<projectname>
Where <projectname> is the name of your project. In my case:
homebrew-espanso
After cloning your brand new repository on your local machine, you are ready for the next step.
Preparing the Formula
You'll now need to create a Formula for your project, a very simple Ruby file containing the instructions to install your binary on the user computers. In fact, Ruby knowledge is not required.
In the cloned homebrew-espanso directory, we will need the following file structure:
- Formula/
    - espanso.rb
- README.md
So go ahead and create the Formula directory, containing the espanso.rb file ( using the name of your project ).
In the espanso.rb file, paste the following content:
# Documentation: https://docs.brew.sh/Formula-Cookbook
#                https://rubydoc.brew.sh/Formula
# PLEASE REMOVE ALL GENERATED COMMENTS BEFORE SUBMITTING YOUR PULL REQUEST!
class Espanso < Formula
  desc "Cross-platform Text Expander written in Rust"
  homepage "https://github.com/federico-terzi/espanso"
  url "https://github.com/federico-terzi/espanso/releases/latest/download/espanso-mac.tar.gz"
  sha256 "2473866b99eef9ea983200b7aac91592b938404ffaa1fb8c72beacb2ebd3203a"
  version "0.1.0"

  def install
    bin.install "espanso"
  end
end
Let's analyze it step by step. In the first line you have to change Espanso with your projects name ( without spaces ):
class Espanso < Formula
Then add a short description for your project:
desc "Cross-platform Text Expander written in Rust"
Then insert your project repository or website:
homepage "https://github.com/federico-terzi/espanso"
In the url field insert the archive URL we obtained in the second section:
url "https://github.com/federico-terzi/espanso/releases/latest/download/espanso-mac.tar.gz"
And then the archive SHA256 hash we calculated earlier:
sha256 "2473866b99eef9ea983200b7aac91592b938404ffaa1fb8c72beacb2ebd3203a"
Then insert your project version ( the same you used in the release tag ):
version "0.1.0"
And finally, change espanso with your binary executable filename, obtained from the first section:
def install
    bin.install "espanso"
end
The last step is to push the homebrew-espanso repo to GitHub:
git add -A
git commit -m "First release"
git push
Here you can check the homebrew-espanso repository.
Installing the Package
All right, if you followed me until here, your users are ready to install the package using Homebrew:
brew tap federico-terzi/espanso
brew install espanso
Where federico-terzi/espanso is your GitHub username combined with the project name.
As an example, let's say your username is jon-snow, your project is called wolf and your homebrew-wolf repository url is:
https://github.com/jon-snow/homebrew-wolf
the users will install your package using:
brew tap jon-snow/wolf
brew install wolf
Conclusion
This was a basic way to publish your package on Homebrew, but things can get much better. In fact, on espanso I automated the whole process using Azure Pipelines so that everytime I push an update to the master branch on GitHub, my project is automatically built, tested and published on Homebrew. Let me know if you're interested to know more about that :)
If you liked the article and want to stay up to date, follow me on Twitter or GitHub :)