After our previous article on automatic code-signing for macOS applications, we are now going to cover the process for Windows binaries. The article is going to discuss all the necessary steps to get a Windows application code-signed, starting from the process to obtain a certificate, all the way down to automating the signing process in your CI pipelines.
The article summarizes the steps we went through to code-sign Espanso, a cross-platform text expander. If you get stuck in the process, I also recommend checking out Espanso’s source code.
Getting a Code-signing Certificate
Choosing a Certificate Authority
Before coding our way into the automatic CI pipeline, we first need to obtain a Code-signing certificate. There are multiple companies you can get one from, so the first challenge is to figure out which one to choose. We could talk to great lengths about the pros/cons of the various providers, but for the sake of this article, let’s summarize it by asking two questions:
- Are you trying to sign the executable as a company or as an individual?
- What is your budget?
These are my recommendations depending on the above answers:
- Company with a large budget: buy an EV certificate from DigiCert, those are the most expensive (currently at ~700$/year) but they offer the best reputation and customer support.
- Individual with a large budget: buy an OV certificate from DigiCert. These are still expensive (~500$/year), but don’t offer as much reputation as an EV certificate (your users will still see Windows’ SafeScreen at first). Unfortunately, individuals can’t buy EV certificates, so this is likely the best you could find
- Individual with a small budget: buy an OV certificate from a Sectigo reseller, like CodeSigningStore.com. I went down this route as Espanso is an open-source project and I had to be careful about the budget. Overall, the experience was ok, and after about 3 weeks of back and forth with their customer support, I managed to get a valid certificate at the price of ~70$/year, thus significantly cheaper than the other options
In short, if you are a company I recommend buying an EV certificate from DigiCert, as they offer the best reputation for your executable. On the other hand, if you are looking to code-sign your program (maybe an open-source project) on a budget, then an OV certificate from a reseller like CodeSigningStore.com could be an option.
The next section will describe the process we went through to get an OV certificate from Sectigo. Feel free to jump to the next one if you already have a certificate or you decide to use a different provider.
Notes
- I highly recommend buying 3 years certificates. Despite being more expensive, they will save you from the “overhead” of re-applying for a certificate each year. Moreover, some certificates (like the OV version) require time to build a reputation, and buying a 3 years certificate means you won’t have to rebuild that reputation once a year.
- If you choose an EV certificate, keep in mind that you will need to have an hardware token (a USB key shipped to you by the certificate authority) connected to the machine while performing the digital signature. This has an important consequence: you won’t be able to use GitHub-hosted CI agents to perform the digital signature, as you can’t connect the physical USB token to them. There are several possible workarounds, but a common one used in professional environments consists in running self-hosted runners for your Windows CI integration. In short, you would keep a physical server inside your company’s office with the hardware token always connected. When a CI build is scheduled, GitHub (or your CI provider of choice) will run the build on your server (having the hardware key connected) instead of a cloud VM.
Buying an OV certificate from Sectigo
After a thorough evaluation of the possible options, I decided to get an OV certificate from Sectigo (or to be more precise, a reseller), as it was the cheapest option I could find with acceptable reviews online (just search for “Comodo reviews” online to get an idea).
For context: Comodo was rebranded to Sectigo in 2018, but there is the same company behind them.
While you could buy a code-signing certificate directly from Sectigo’s website, I decided to buy it from a reseller, as the end result would be similar at a fraction of the price. I personally choose CodeSigningStore.com as it seemed the reseller with the least bad reviews online (not exactly reassuring, I know).
So I went ahead and paid 207$ for a 3 years Sectigo certificate.
Shortly after, I received an email with a link to submit a Certificate Signing Request (CSR), a file containing your public key and other information. This will be used by the certificate authority to generate the certificate.
Generating a Certificate Signing Request (CSR)
As discussed above, we need to submit a CSR to the Certificate Authority to generate a certificate. While there are multiple ways to create a CSR, these are the steps to generate one using openssl:
Note: If you are on Windows, the easiest way to get
opensslis by using the executable distributed as part of agitinstallation. In my case, after installing Git, I had access to theopenssl.exeexecutable in this path:'C:\Program Files\Git\usr\bin\openssl.exe
- Open a Powershell terminal
- Run this command to launch the generation wizard:
& 'C:\Program Files\Git\usr\bin\openssl.exe' req -newkey rsa:4096 -keyout PRIVATEKEY.key -out MYCSR.csr
- You will be presented with a series of prompts:
- Create and verify a password. This is the password used to protect your private key, make sure to save it somewhere, as we will need it later
- Insert the Country name, a two-letter code for your country (see a list of possible values)
- Insert the Locality name, the name of your city or town
- Insert the Organization name, the name of your company/organization/personal name
- Insert the Common name, the name of your website (such as
espanso.org) - Insert the Email address
- Skip the challenge password
- At the end of this process, you should find a
PRIVATEKEY.keyfile containing your private key and aMYCSR.csrfile containing your certificate signing request. Keep both of them in a safe place as we will need them soon - Submit the
MYCSR.csrfile to the Certificate Authority
Completing the verification process
After your request has been sent, the Certificate Authority will request additional information to verify your identity. This will usually take a few days or weeks, but in the end, you should receive a certificate.
Preparing the Certificate
After the certificate has been issued, we need to turn it into a format compatible with our target CI pipeline. The following steps are necessary for Sectigo-issued certificates, but keep in mind the process might be slightly different with other Certificate Authorities. Our goal is to obtain the code-signing certificate in PFX format, encoded as base64.
Verify that the Certificate and Private key match
Before diving into the actual conversion process, it’s a good idea to verify that the certificate being issued matches our private key (the one generated with the CSR).
To verify that, we need to run two commands:
openssl rsa -modulus -noout -in PRIVATEKEY.key | openssl md5
and also (with user.crt being the certificate issued by the CA):
openssl x509 -modulus -noout -in user.crt | openssl md5
If the output of the two previous commands match, then the certificate is correct!
Troubleshooting “Expecting: TRUSTED CERTIFICATE” error
In my case, the previous commands returned the following error:
unable to load certificate
34359836736:error:0909006C:PEM routines:get_name:no start line:crypto/pem/pem_lib.c:745:Expecting: TRUSTED CERTIFICATE
This error is due to the user.crt file being encoded in the wrong format. Luckily, we can solve this problem by following these steps.
Convert the certificate to PFX format
After verifying that the certificate matches our private key, we are ready to “bundle” all of them together into a PFX certificate. We will use openssl for this step as well:
& 'C:\Program Files\Git\usr\bin\openssl.exe' pkcs12 -export -out codesign.pfx -inkey .\PRIVATEKEY.key -in .\certificate.crt
Where:
PRIVATEKEY.keyis the private key we generated during the CSR step.certificate.crtis the public certificate issued by the Certificate Authority. In the case of Sectigo certificates, this file is not theuser.crtcertificate directly issued by the CA, but refers to the converted certificate after following these steps.codesign.pfxis the output PFX certificate file.
Test the code-signing process manually
Before diving into the process to build an automatic signing pipeline, let’s verify that the code-signing certificate works as expected by attempting a manual signature.
We will need Microsoft’s
signtool.exeto perform the following steps. You can get it by installing the Windows 10 SDK using Visual Studio. More info on this StackOverflow thread.
We can sign an executable by opening a terminal and running the following command:
"C:\Program Files (x86)\Windows Kits\10\bin\10.0.19041.0\x86\signtool" sign /fd SHA256 /p "<PASSWORD_HERE>" /ac SectigoPublicCodeSigningRootR46_AAA.crt /f codesign.pfx /tr http://timestamp.sectigo.com/rfc3161 /td sha256 yourProgram.exe
where:
"C:\Program Files (x86)\Windows Kits\10\bin\10.0.19041.0\x86\signtool"is the path tosigntool. This path will vary depending on the Windows 10 SDK version being installed, so make sure to update the path accordingly."<PASSWORD_HERE>"should be replaced by your private key’s password (the one we choose during the CSR generation)SectigoPublicCodeSigningRootR46_AAA.crtis the path to an appropriate intermediate certificate. You can download the appropriate ones for Sectigo here and for DigiCert here.codesign.pfxis the path to the certificate we generated in the previous step.yourProgram.exeis the path to the executable we want to sign
After running this command, right-click on the executable and choose “Properties” > Digital Signatures tab. If everything was correct, you should now see an entry for your signature, as shown in the image below.
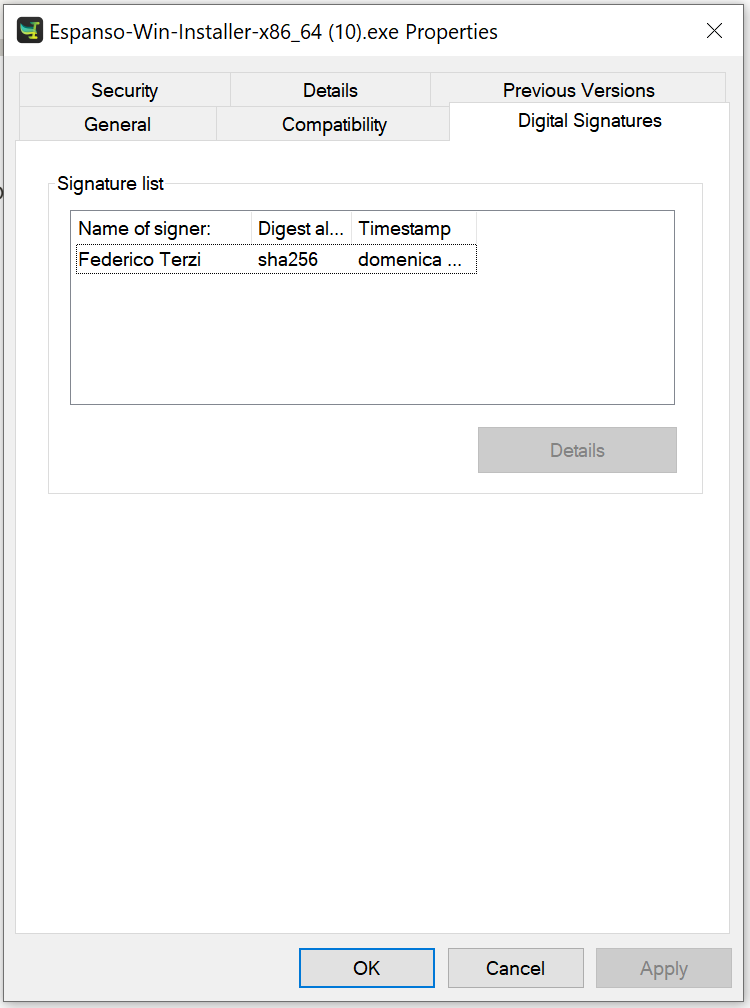
If you don’t see a “Digital Signatures” tab, then it means the signature process didn’t complete successfully. Make sure to double check all the paths used in the above command.
Automating the signing process on a CI pipeline
Now that we successfully signed an executable with our new certificate, we are ready to automate the process as part of a CI pipeline. For this example, we are going to use GitHub Actions as platform, but these steps could be adapted to most providers with minimal changes.
A note on EV certificates
If you are using a company’s EV certificate, you will likely need a hardware token (a USB key sent by the certificate authority) to sign your executables. As a result, you won’t be able to use cloud-hosted CI agents, as there is no way for you to connect the hardware token there.
In these scenarios, a common solution is to maintain a physical server in your company’s office with the hardware token always connected. At this point, you can use GitHub’s self-hosted runners to execute the CI pipelines from your local server, which will be connected to the required hardware token.
Converting the certificate to base64
In order to store the certificate as a GitHub Action Secret, we need to encode it as base64 string. An easy way to do that on Windows is to run the following command:
certutil -encode codesign.pfx base64cert.txt
If you also want to use an intermediate certificate (the SectigoPublicCodeSigningRootR46_AAA one we used above), you should generate the base64 of that one as well.
Preparing GitHub Secrets
At this point, we are ready to add the information we gathered so far as Secrets. Open your project’s repository and navigate to Settings > Security > Secrets > Actions and add the following variables:
CODESIGN_BASE64should contain the certificate encoded as base64, the one we prepared in the previous sectionCODESIGN_PWDshould contain the private key’s password- (Optional)
CODESIGN_INTERMEDIATE_BASE64the base64 of the intermediate certificate, if you’re using one
Automating the code-sign process
At this point, we are finally ready to automate the code-signing process. For the sake of this example, we will sign an executable located in path: target/release/espanso.exe , make sure to update it with the actual path of your program.
The final Action step configuration will look like the following:
- name: Sign executable
  env:
    CODESIGN_PWD: ${{ secrets.CODESIGN_PWD}}
    CODESIGN_INTERMEDIATE_BASE64: ${{ secrets.CODESIGN_INTERMEDIATE_BASE64 }}
    CODESIGN_BASE64: ${{ secrets.CODESIGN_BASE64}}
  run: |
    New-Item -ItemType directory -Path certificate
    Set-Content -Path certificate\certificate.txt -Value $env:CODESIGN_BASE64
    certutil -decode certificate\certificate.txt certificate\certificate.pfx
    Set-Content -Path certificate\intermediate.txt -Value $env:CODESIGN_INTERMEDIATE_BASE64
    certutil -decode certificate\intermediate.txt certificate\intermediate.crt

    & 'C:/Program Files (x86)/Windows Kits/10/bin/10.0.22621.0/x86/signtool.exe' sign /fd SHA256 /p $env:CODESIGN_PWD /ac certificate\intermediate.crt /f certificate\certificate.pfx /tr "http://timestamp.sectigo.com/rfc3161" /td sha256 target/release/espanso.exe

    Remove-Item -Recurse -Force certificate
In a nutshell, these are the steps performed above:
- Load the secrets as environmental variables
- Load the base64 certificates and convert them back to their original format
- Invoke
signtool.exewith the relevant parameters - Remove the temporary certificate files
Notes
- If you are not using an intermediate certificate, you can remove the
/ac certificate\intermediate.crtflag and all the lines that contain “intermediate”
Alternative approaches
There are also other approaches you might prefer:
- If your project is written in Rust, you could take inspiration from our PR: https://github.com/espanso/espanso/pull/1352/files
- Use a pre-built GitHub Action such as: https://github.com/Dana-Prajea/code-sign-action
Conclusion
In this article, we discussed the process to get your Windows program code-signed, starting from the choice of certificate authority, all the way down to a fully automated CI pipeline. The article was mostly focused on Sectigo certificates and GitHub actions, but most steps can be applied to other certificate authorities and CI platforms.
If you are also distributing your app on macOS, you might also enjoy my article on automatic code-signing and notarization for macOS apps.